Followers

Saturday, October 30, 2010

Fresh Brewed Designs DT Call

Heather Dennis from Fresh Brewed Designs asked me to help get the word out about her design team call.  The full text of the call is listed below:

Fresh Brewed Designs is having a FULL DT CALL. I am looking for people who love to create and are excited to be a part of getting a new business on it's feet and walk around out there. I a looking for someone who wants to meet new people and fellowship Fresh Brewed Designs style!
If you are interested, here is how you can apply for the team and what we require:

Fresh Brewed Designs is having a DT call starting today, October 27th and running through Wednesday, November 10th at 9:00pm EST. Details are listed below.
  • DT terms will be for 6 months starting November 17, 2010 and running through April 13, 2011.  The 10+ new DT spots will be announced on the Freshly Brewed Challenges blog on November  13th. You can reapply again after your 6 month term is over if you are interested in staying.would love for you to use a Fresh Brewed Designs image on one of your cards, however it is not required for your application.please let me know in your application. required to have a blog to apply.Wednesday challenges.for that week when you can. This is not a requirement.and a 40% discount to the shop on all digi images. news in one place. Emails will be sent as well, but I know they tend to get lost, so this will be a  place for us to stay organized.
  • Please email two cards to me ( freshbreweddesigns AT yahoo DOT com ) with your application. I 
  • If you are interested in being a DT coordinator to help with blog hops and challenge posts, 
  • Please send a list of all design teams you are currently on and a link to your blog. You will be 
  • As a Fresh Brewed Design Team member You will be responsible for participating in our weekly 
  • You will be asked to participate in the challenges of blogs Fresh Brewed Designs is sponsoring 
  • You are required to be a part of all monthly blog hops and new images releases.
  • You will be given 5 images of your choice to start on the team, 2 images from every new release 
  • You will be required to join the Fresh Brewed Crew blog for challenge updates and all the FBD 

**when emailing me please include FBD DT Call and your name in the subject line**  
Fresh Brewed Designs is in the process of creating a
  • new website
  • new groups
  • a facebook page
  • lots more fun! 
Thank you for taking the time to read the post. I can not wait to see your applications.
Heather 
 
I hope you will take some time to check out Fresh Brewed Designs Etsy store here.  Can you tell that Heather loves coffee? :-)
 
~~~  Lee  ~~~

Vellum Butterfly Sympathy Card

One of the cards I don't make a lot of is sympathy cards.  It's one of those things that I usually have to make specifically for that person.  I decided to step out of my comfort zone and make this card for the batch I made for my DGS's youth football fundraiser.
I thought this DP would look nice with the butterfly stamp that I stamped and heat embossed on vellum.  Color was added to the back of the vellum with highlighters to soften the colors.  In Deepest Sorrow by Hambo Stamps was stamped on ivory cardstock, and then the edges were punched/embossed with a Fiskars corner punch.  Since I finally bought a REAL distressing tool, I decided to use it on the edges of the DP.  The distressed edges and the edges of the sentiment were then inked with Walnut Stain Distress Ink.  The ribbon is from my stash, and the butterfly was attached with foam adhesive. 
The inside uses the same DP and techniques as the front.  This sentiment was stamped on ivory cardstock and handcut.   All of these edges were then inked with the Distress Ink to match the front.  I loved that I was able to use some more of the gorgeous cards from The Paper Cut Venus card kit to make this.  The color is a deep eggplant if your monitor doesn't do a good job with colors.  I bought a bunch of clear acrylic stamps online, and none of them was marked with the manufacturer.  If anyone knows who makes the stamp on the inside, please let me know so I can give them proper credit.

  ~~~  Lee  ~~~

Wednesday, October 27, 2010

Winter Snowflake Medallion

Did I ever say that I loved medallion stamps?  Probably only about a hundred times!  This snowflake medallion is made by my favorite medallion company, Holly Berry House.  If you've never been to her website, you need to check it out!  I stamped the medallion and heat embossed it on four different colors of cardstock, and then I cut it out as close as possible to the embossing.  The base of the medallion is usually cut about 1/4" from the embossing to help ground it to the background.  Next was the fun part.  I went inside the embossed lines with a Zig fine point glue pen, and then sprinkled it generously with several different colors of Magic Scraps glitter.  Then, I added the medallion to this card from The Paper Cut with Scotch Quick Grab Adhesive because I didn't know what type of coating was on the card.  To finish off the front, I added some rub-ons from Heidi Swapp.
The inside of this card includes the text insert from the card kit.  I stamped this sentiment by Comotion with Top Boss embossing ink, and then heat embossed it with purple embossing powder.  I ran the snowflake through my Xyron, so I didn't have to worry about glue creeping out from the sides.
Here's a close-up of the front of the card to show some of the dimension that's achieved by using foam adhesive between each layer.  Since I use thin foam adhesives to glue the medallion together, it usually isn't affected by the machines at the post office. 
I like to send winter cards to my Jewish and others who don't celebrate Christmas, and this type of card does the trick.  Since this is one of the few times that people communicate every year, why exclude these people?  I personally don't need an excuse to send a card, but we all know people who only send cards once a year. :o)
* * * * * * * * * * * * * * * * * * * * * * * * * * * * * * * * * * * * * * * * *
I'm sure you may have noticed the Operation Write Home blog hop announcement at the top of my sidebar.  If you would like to be a blogger for the hop, sign-up at Operation Write Home .  This will be the first anniversary of my first blog hop that I ever participated in (& it was with OWH), so I guess that's as good a reason as any to offer some BLOG CANDY for the hop!  Even though this card has glitter on it, please don't make cards for the troops with loose glitter on them.  We don't want to compromise the safety of our troops by having a few flakes fall off on their uniforms.  THANKS!

~~~  Lee  ~~~

Saturday, October 23, 2010

MPS Full Moon Fever Blog Hop

Welcome to another stop on the Michelle Perkett Studio Full Moon Blog Hop!  If you arrived here from Lynne's Doodlebug Designs blog, you're in the right place.  If not, you will want to go back to the start at Michelle's Enchanted Inspirations blog, so you don't miss anything along the way.   They'll be prizes for some hoppers, so don't forget to say Trick or Treat or you may be left in the dark!

This weekend boasts a full moon, and fans of Michelle Perkett Studio wanted to celebrate it by showing off our Halloween goodies.  Since not all of the stops on the hop are in the U.S., we decided to open up the hop to showcase other traditions that are shared by other countries at this time of year.  Fall is such a beautiful time of year, and the creations along the way will surely impress you.  But don't daddle or stray, or you may come across some witches or other creatures that go bump in the night!

The card I made for the hop features three of Michelle's images.  You may think that freebies aren't good enough for blog hops or challenges, but you'd be wrong!  All of Michelle's images are great, and you may want to check out the freebies at her group on Paper Craft Planet.  If you want to see more of Michelle's images, just hop on over to her Etsy shop to see all of her fabulous creations!  You won't be disappointed!

The boy image on my card is called Thomas, and he is the brother of Mary Margaret who is in the witch costume.  Mary Margaret got all dressed up for the costume party, but Thomas thought it was too childish to dress up.  At least Mary Margaret's best friend is dressed as Goldilocks for the party.

All of the images were colored with colored pencils.  The orange DP is by The Paper Studio and the other is by Cloud 9 Design.  The ribbon is another one of my finds at the Target $1 Spot, and the rhinestones are all from my stash.  The cat is from the $1 bin at Michael's and the tombstone is another free image by Angie Whalley.  Don't you just love Mary Margaret's witch hat that was another freebie from Dustin Pike at Doodle Dragon Studio, and her pumpkin is a sticker from my stash.

Your next stop on the hop is at the super talented Marilyn's Cards and More blog.  If you get lost along the way, just go to the Michelle Perkett Studio challenge blog for a full list of participants.  Have a fangtastic full moon fever blog hop! 

~~~  Lee  ~~~

Challenges:
Michelle Perkett Studio - Witches Brew mixed with Halloween
Stamp Something - Use a Digi
Crazy 4 Challenges C4C60 - Halloween
Digis With Attitude - Bling it On!
Paper Cutz #64 - Halloween project with stars, circles, diamonds or crescents
Raise the Bar #41 - Orange, Black and Purple
C.R.A.F.T. Challenge 73 - Spooky  ***WOO HOO! - I won!!!!
Dutch Dare - Halloween or Color Challenge
Fab 'n' Funky Challenges - Things that go bump in the night
The Creative Cottage - Halloween (10/27)
Creative Craft Challenges - Trick or Treat
2 Sisters - Anything Goes
The Crazy Challenge - Halloween
Stamping Vacation - Sticky Situation; Pumpkin Sticker

Thursday, October 21, 2010

Thanksgiving Cross

I originally thought I would make this card front into an Easter card, but realized it would also fit as a Thanksgiving card.  This DP in the background is from The Paper Studio, and the cross is from a mat stack by DCWV called Once Upon A Time.  After I hand cut the cross and matted it on brown cardstock, I decided to soften it by adding the edges of a doily around the edges.  The Give Thanks sentiment is by VAP Scrap, and was heat embossed with Hampton Arts brown embossing powder.  Since I don't have any of the die cutting machines, I ocassionally use my Martha Stewart scoring board for some added interest.  On this card, all I did was flipped the card over and scored it 1/8" from all of the edges.  The scoring was also done on the cross to match the background paper.
The inside included one of my favorite Thanksgiving images made by Stampabilities.  It was also heat embossed with Hampton Art's brown embossing powder that I got at Joann's.  I usually use this image on the front of the card, so it was nice to know it works as well on the inside of a card.  Since so much work is usually put on the front of the card, I like to keep the inside simple even though this image is more ornate. 

Although the deadline for Thanksgiving cards has already passed for Operation Write Home, it's not to late to mail in your Christmas cards.  You have until October 30th, and don't forget to add some Any Hero cards that are also requested at this time.  Instead of making cards specific to Christmas, I also like to make winter cards that  the troops can send for longer periods of time.  Birthday, Love, Thinking of You, Anniversary and other such cards are always needed and appreciated at Operation Write Home.  Don't forget to stop by the Operation Write Home Stars and Stamps blog to see the latest challenge, tutorials and more!  THANKS!

~~~  Lee  ~~~

Challenges:
Stamping Vacation - No! No! Challenge; nothing that starts with S

Wednesday, October 20, 2010

Owl Always Love You


In my last posting, I told you about the cards I had made for a fundraiser for my DGS's youth football league.  Well, here's another card that I included in the box.  Even though it was real easy to make, it gets right to the point (just like most men).  The cardstock is a green metallic that I got in an ebay deal.  The Owl always Love You sentiment and flower were from a clear set of Studio G stamps by Hampton Arts.  The heart was included in a mini flip Studio G package that I got for $1.00 at Big Lots.  Gotta love those bargains! 

I stamped and heat embossed the images with my favorite Pearlized Carnelian embossing powder from Stampendous.  This adorable owl paper is by The Paper Studio.  The inside was stamped with the same embossing powder.  The owl is from the Owl always Love You clear set, and the sentiment is by PSX.  The embossing powder color on the inside is closer to what it really looks like in real life.  I'm still having problems getting all of the colors right on my new camera. 

Like I said, easy peasy, but it does the trick!  It may be early for Valentines cards, but you could always change the inside to fit the holiday (or maybe just because). 
~~~  Lee  ~~~

Saturday, October 16, 2010

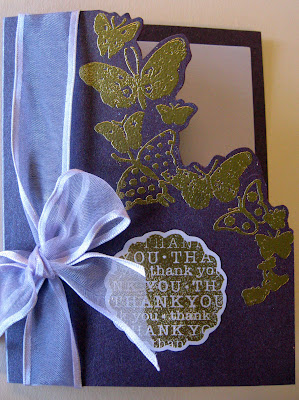
Butterfly Thank You Card

I recently made a bunch of cards for a fund raiser for my DGS's junior football league.  They have an annual dinner with a guest speaker, and afterwards they have a silent auction with tons of terrific donations.  I was honored to be asked to donate to this worthy cause.  
 
I've been buying some supplies on eBay, and this fabulous card base is one of my best buys!  It's made by The Paper Cut, and this stunning kit includes the cards, envelopes, layering swatches and matching text inserts.  This kit is called Venus, and it's one of their layering card kits.  Even though I didn't use the front layering paper, I did cut around the butterfly images, so the inside paper is visible from the front.  The butterflies are made by Inkadinkado.  Unfortunately, I don't know who made the other set of clear stamps since they weren't in their original packages when I bought them.
All of the images were stamped with Top Boss embossing ink, and then heat embossed with Joann's Gold Essential embossing powder.  The scalloped circular image with all of the thank you's was stamped on the layering swatch, and then hand-cut with scissors.  It was attached with Scotch's Quick Dry Adhesive since I wasn't sure how the glue runners would hold up with this coated cardstock base.  The gorgeous ribbon from my stash was all that I needed to finish off the front of the card.
The inside used the text insert piece that I stamped and embossed with butterflies and the Thanks Very Much text. Again, I attached the paper with the Scotch Quick Dry adhesive. Although this was one of my easier cards to make, it definitely is more elegant looking than most of my creations. See how easy it is to create something fabulous when you have quality products to work with?

I'm off to spend the weekend with Chelsey while her hubby is hunting.  It will be fun to finally help her do some of the things that she wants to do to the room for the baby.  Since the pregnancy has been so troublesome, she didn't want to do too much for the baby until things were more stable.  I finally get to do some real grandma things there!
~~~  Lee  ~~~

MPS Meadow Fairy Card

Sorry - I'm having some issues with Blogger right now.  Blogger decided I must have played around enough with this posting and published it anyway.  Don't you just love technology?  I'll try again later.
~~~  Lee ~~~

Thursday, October 14, 2010

Some Fall Inspiration

I love making medallions, so this Autumn Leaf medallion stamp from Holly Berry House really inspired me.  I love all of the beautiful colors of fall. Ever since I moved to Colorado from Ohio over 20 years ago, I still haven't seen anything that compares to the colors of the leaves in the fall there.  We have the beautiful golden colors of the aspens on the mountains, but the maples, oaks, hickorys, elms and other trees that are so prevelant out east are hard to beat in the fall.
I used Top Boss embossing ink with some brass embossing powder from Joann's, and then I heat set the image on four different colored pieces of cardstock.  The bottom layer of the medallion is usually cut out about 1/4" from the embossing.  The other layers are cut as close as possible to the image.  If you get too close, this will usually make that section of embossing pop off.  I found this beautiful gold doily at a garage sale, and it fit perfectly under this image for even more glitz!  Before I added the foam adhesives for dimension, I glued matching Magic Scraps ultra-fine glitter on the leaves with a Zig 2 way fine tip glue pen Squeeze & roll).  Don't you wish that glitter showed up better in pictures?  The luscious gold paper from Denami and this deep purple mulberry paper were a perfect fit along with this textured brass paper from a metallic stack from DCWV.  The green with gold dots paper from my stash.  To finish it off, I added some Precious Metal Coppered Out Swirls rub-ons from We R Memory Keepers, and then ran a Pilot gold marker along the edges of the papers.  I can't wait to show you some of the other medallion creations I've made.
Isn't this Inkadinkado turkey just too cute?  I got him several years ago, and have used him every year since.  Instead of really coloring him up like I usually do, I decided to just chalk in some light color and highlight him with a white Ranger Inkessentials gel pen after I stamped and heat embossed him.  This design papers are some that I hoarded from Hobby Lobby last year.  The daisy paper was from an ebay seller, but I wish I knew who made it so I could get more.  I don't have any of the die cut machines, so the oval was cut with a Fiskars Oval cutter and the decorative corners by a Emagination punch.
The Target $1 Spot is the first place I look when I go to Target.  They have some great finds there like this adorable enamel brads, and the leaves were from yet another shopping trip there.  The K & Co. paper ribbon was a perfect finish to this adorable turkey.  To make it look just a bit more rustic, I added just a bit of Walnut ink Distress Ink dabbed around the corners of the matting and background.
The final card here is also a bookmark.  I love this Pearlized Carnelian embossing powder color from Stampendous, and it was a perfect color for this great looking scarecrow from Stamp Affair.  Since the embossing powder was pearlized, I decided to get out the Twinkling H20s to paint the image with a water brush.  The background was stamped with some Memories dye ink with several different leaf stamps from Stampin' Up!  This ink was then dabbed around the sides of the card and bookmark.  The rub-ons from my stash were added at the top for some more visual interest.

It's hard to believe that the inside of the card here is the same color as the card above.  I took at least five different pictures, and this was the best one out of the group.  There was some more of the background paper left, so I glued it to the inside with Ad Tech glue runner, and added this heat embossed sentiment from Stampin' Up! on some matching cardstock from my stash.  I just realized that I didn't ink the edges on the inside.  Maybe that's why I couldn't get a decent picture of the inside! lol
 
I hope some of these give you some inspiration to get your fall cards finished now since Christmas will be here before you know it!  <]:o)


~~~  Lee  ~~~

Challenges:
No Time to Stamp - Hard Rock Cafe'
Delightful Challenges - Metal Mania
Pals Paper Arts - Inspiration
Inktegrity Design Team Challenges - Fall or Halloween
The Sisterhood of Crafters - Show Us Your Bling
GingerLoft Digi Stamps - All That Glitters or Blings
Pear Tree Designs - Autumn
My Partner in Craffting Blog - Shine on You Crazy Diamond
Craftalicious Challenges #10 - Anything Goes
Paper Sundaes - A Change of Season
Let's Ink it Up - Halloween Colours

Spooky $1 Inkadinkado Halloween Images

I love all the thrills and chills of Halloween, so these fabulous Inkadinkado images that I found at Michael's for only $1 a pack were perfect for me!  The price made them even more of a thrill!  I teamed these images up with some Scenic Route paper, stickers and brads that I found at Tuesday Morning, and then I found this wonderful sparkly bat border in the Target $1 Spot.  I had to add this cool spider web sticker to the tree from my stash.  To top it off, the sparkly fibers were from a hair tie that I took apart to use on cards.   
The images were stamped on white cardstock with Memento Black Tuxedo ink.  Next, I sponged on some Walnut Stain Distress ink all over the paper to make it match the design papers better (The colors do really match in real life!).  The deckle scissors added more of an eerie feeling to all of the edges on the design paper and cardstock.  This card went together real easy after I stamped the images.  They were from three different Inkadinkado sets.  No cutting, popping up or other special effects were used to make these images pop.  They could even stand alone for an even easier card.
The inside uses another Inkadinkado image.  Doesn't this just scream Halloween to you?  I also used the Distress ink on the paper and hand cut and matted it on the black cardstock.  The border and word stickers were from the kit that I got at Tuesday Morning (that I now see needs to be reinforced with some Scotch quick grab glue).  My daughter tells me that I'm strange in sending Halloween cards to people (especially my grandkids).  How about you?  Do you make and send any Halloween cards?

~~~  Lee  ~~~

Challenges:
Double Dutch - Halloween Creation
My Grafico Challenge #70 - Anything Goes
The Fuzzy Wuzzy Challenges - Multiple Images & Make it Spooktacular
Stamping Vacation - Animal Applause (11/14)
Stamping Vacation - Halloween (10/23)

Wednesday, October 13, 2010

GingerLoft Hug Your Dog Card

Well, I'm still alive and without a computer.  They were able to fix the computer and save all of my pictures and digis, but the cost wasn't in my very tight budget so I need to make payments before I get it back.  I'm still using a loaner computer for now, and was actually able to download some pictures of the cards I've been making lately. 

I love this image called Playground by GingerLoft.  Since my daughter is a dog trainer and an Animal Welfare Officer (and a MP in the Colorado Army National Guard) when she's not on total bed rest during her pregnancy, I figured this image would be a perfect one to use to help cheer her up.  Well, it worked!  She loved the card, and she even took pics of it to send to her friends from work.
This was the first image I purchased from GingerLoft, and I know there will be tons more that I can't live without!  I printed this digi image onto Georgia Pacific cardstock and immediately heat embossed it with clear detail embossing powder.  Next came my trusty Prang colored pencils and baby oil as a blender.  This is the first time I just ran a shadow of blue around the image.  It definately saves time on the background, and it also seems to make it pop off the page without having to cut the figure out.  The paper is some more scrap paper that I've been trying to use up that probably came from Hobby Lobby.  The adorable felt ribbon is from K & Company, and the pearls are from Michael's.  There is also some Magic Mesh on the top section for a bit of extra zing.
What would a dog be without his bones?  These adorable embossed stickers are made by American Traditionals Designs that I found at Big Lots.  The corners were all rounded with a corner punch, and the front of the card is finished off with a paw print punched out of the design paper.  The inside mimics the front with the same design papers and paw print punch.  I can't remember who this saying is from, but I'll post it here when I get my computer back.  The tennis balls and bones are all from the American Traditionals Designs pack of stickers, and the I Ruff You sticker is from a Bubble-A-Bilities package from the Paper Studio.  The closeup below really shows the detail on this adorable bulldog.  If you like this stamp, you'll really love Tami's other stuff!  I can't wait to use the Winter Tree, Christmas Door, Cowboy, Nature's Song Collage and other digis I bought from her during some of her great sales! 
If you were wondering how my daughter, Chelsey, is doing, so far, so good.  She's now out of the hospital, but she's still on total bed rest.  The baby weighs just over 3 pounds now, and is doing well (except keeping mom up with his kicking!).  The 800 mg of Ibuprofen she has to take 3 times a day is really messing with her stomach, so hopefully the spasms in her cervix will stop soon.  She is almost 28 weeks along now, so we are very blessed to have him cooperate with the doctors and not want to pop out too early!  Thanks again for all of your prayers and words of encouragement!

I've actually finished a ton of cards for a craft show and a for a benefit for the youth football league, so now all I need to do is write up all of the details.  Now, I just need to remember what I used to make them! :o) 

~~~  Lee  ~~~

Challenges:
The Sisterhood of Crafters -  All things Bling
GingerLoft Challenge Blog - All that glitters or blings
The Crafty Pad - Make Something for a Friend
Cowgirl's Sunday Stamp'en Challenge - Girly Girl
Stamping Vacation - To Who - Someone That Needs a Hug

LinkWithin

Related Posts with Thumbnails