Followers

Monday, December 28, 2009

Get Sketchy's Basic Grey Giveaway!


I love blog candy as much as the next person, but the blog candy they're offering over at the Get Sketchy Blog is beyond belief! Check out the details here: http://getsketchy.blogspot.com/2009/12/free-basic-grey.html

You can get up to 10 chances to win if you follow the simple requirements! I'm getting one just posting this here. Better yet, if they break 1,000 followers, they will add more goodies to the already awesome pot! Make sure you tell them grandmalee sent you if you sign up for this blog candy!!! ~ Lee

Friday, December 25, 2009

Merry Christmas & a Whimsy Stamps Reindeer Card


I had to post at least one of the cards I was scrambling to finish for my own family! I'm always making cards for so many people that I don't know that I sometimes forget my own family. Not this year! This is one I made for one of my daughters.

The image is one I won on a blog hop for Whimsy Stamps. Isn't he adorable? I stamped & embossed him & then cut out the second image after coloring him with Twinkling H20s. The sky area was then colored with makeup sponges & several different dye ink pads from Adirondack. I then cut out the painted reindeer & attached him with foam adhesive on top of the first image. I added a shadow with the Twinks and added Magic Scraps white glitter to stimulate snow.

Next, I used DCWV textured cardstock as a mat and inked the edges. This was put on top of the Paper Studio DP that also was inked around the edges. All of this was put on a Stampin' Up! card base. I found these adorable die cut snowflakes from Bazzill called Just the Edge since I'm one of the few cardmakers that doesn't have a diecut machine. After I added some Magic Scraps glitter to add some glitz to the card, I glued it on with a Zig glue pen. I was going to add more to the card, but I didn't want to detract from the image.

I've been trying to get Valentine's cards finished to send to Operation Write Home, so I'll try to get some posted. I didn't get all of my family's Christmas cards out in time, so I'll be sending them New Years cards instead (hopefully). I may even try some challenges since things are finally slowing done some.

Merry Christmas everyone! Lee

Thursday, December 17, 2009

New Digi company - Karen's Doodles


I found another new digi company when I was blog hopping, and I just had to share it with you. You must go to Karen's Doodles at http://karensdoodles.blogspot.com/ and check out the wonderful detail on her whimsical digis. If you still aren't sure about digis, she has a free one to share with you so give it a try. She is also offering blog candy to her followers of her 11 new releases in red rubber. Go to her site now before it's too late!

Monday, December 14, 2009

Sweet Pea Stamps New Releases & Blog Candy

Have you seen the new releases yet for Sweet Pea Stamps? OMG, they are gorgeous! One of the DT members, Holley Barnhart, introduced me to these wonderful stamps. If you would like to win 2 of the cards that are made by the DT, all you have to do is go to their blog at: http://sweetpearubberstamps.blogspot.com/2009/12/sweet-pea-blog-followers-would-you.html & become a follower. They draw on the 15th & 30th each month, so go now for your chance to win some gorgeous cards! Don't forget to look at the beautiful eye candy while you're there! ~ Lee

Saturday, December 12, 2009

I won at the Prickley Pear Blog!

I know I've been MIA lately, but my daughter & grandson both had birthdays this week, I've been decorating my place & the apartment complex where I live, and I was also trying to finish all of my shopping so I could finish making the rest of my gifts at home.

Imagine my surprise when I checked my email tonight to see that I had won a gorgeous poinsettia ornament kit from the Prickley Pear rubber stamp blog's 12 Days of Christmas: http://prickleypearrubberstamps.blogspot.com/
Don't you just love what they did with this kit???? I can't wait to get it, so I can make them for ME!!! Yes, I LOVE poinsettias, but I'm really happy that I won something that I absolutely adore!

You may also want to check out their sketch challenge at: http://prickleypearrubberstamps.blogspot.com/ You still have a little time left to get your entry in for some awesome prizes worth over $60! ~ Lee

Thursday, December 3, 2009

Freebies for the Holidays

It seems that lots of sites are getting into the holiday spirit & are giving away lots of freebies! Please remember when you download some of these freebies to leave them a thank you. Too many sites have already stopped giving away freebies because people failed to thank the designers. As my grandma would say, this is just plain rude!

One great place to start would be at: http://dschristmasaroundtheworld.blogspot.com/ They have tons of digis that are great for scrapbooking or card making. I counted 47 different blogs that are offering freebies, so I'm sure you'll find something you can use here.

Another site called docrafts Creativity offers a card making project of the week, & they are now offering a daily project at: http://www.docrafts.co.uk/asp/projects/searchResults.asp?id=56&t=1

If you love Tim Holtz like I do, you need to go to his blog for this year's rendition of his 12 days of Christmas tags. It's already Day 3, so don't forget to go back to the beginning at: http://timholtz.typepad.com/my_weblog/

This is my first post since I received a "gift" of a stomach virus from my grandson (which is agonizing for a person with Crohn's Disease). I'm still not 50% yet, but I'm able to sit up & read without too many problems (except some mad dashes to the porcelain throne!). Hopefully I can work on some cards today since I have lots of new rubber I've been wanting to share. ~ Lee

Monday, November 30, 2009

The Night Before Christmas - Papercrafter Style

I was just reading Michelle Zindorf's blog, and she had this poem on it that was sent to her by Arlene Vita:

Twas the night before Christmas, I’m glued to the tree.
I’m wondering what Santa brought just for me.
Could it be cardstock or inkpads or lace?
Or some stamps, I said, with a smile on my face.
And that’s when I heard him……
“Hi Santa, ” I said
He replied, “You know….good girls should be in their beds”.
“I know I should Santa,and now I’ve been caught.
But I was just so excited to see what you brought.”
“Well, let’s take a look in this room where you work”.
He shook his head quickly, and left with a jerk.
I heard him exclaim as he put it in gear.
“You’ve got enough crap,
I’ll see you next year!”

Michelle agrees with me that you can NEVER have enough stuff! ~ Lee

Saturday, November 28, 2009

RIP Maxine McBride

Sadly, my oldest grandson's great-grandma, Maxine McBride, lost her battle with lung cancer on Thanksgiving with all of her family by her side. Maxine was a blessing to all that knew her. She had just been diagnosed about a month ago after the disease had already spread into her bones.

Nonni, as my grandson always called her, was a wonderful influence on Bailey. She had him stay almost every Saturday night, and then he would go to church with her. She always attended his school and sport functions. When my daughter and his father were divorcing, she was the drop-off site for my grandson to keep the peace. Throughout all of this, my daughter still considered her a wonderful part of the family.

Please join me in sending my prayers to her family as they celebrate her life. She has joined the loves of her life in Heaven; her husband, Nile, and our Almighty Father.

Wednesday, November 25, 2009

Happy Thanksgiving!


Happy Thanksgiving to all of you out in blog land! I'll be spending the day with my family, but thought I'd share the card I made for my oldest daughter's family.

I love this adorable turkey from Inkadinkado. He was stamped with black Versafine ink & embossed with black Ranger Superfine Detail EP. After coloring him with chalks to fit the muted tones of the paper, I highlighted the image with a white gel pen and then sprayed with a matte finish. The gel pen was also used for the faux stitching. All of the edges of this unknown design paper were inked with Tea Dye Distress Ink. All of these cute brads with fall designs were from the Target $1 Shop and the ribbon by Martha Stewart Crafts. The leaves were another Target $1 Shop find.

This card fit the following challenges even though they were late: Simon Says Stamp challenge which is to use animals @ http://simonsaysstampchallenge.blogspot.com and the sketch is from http://charismacardz.blogspot.com/

I'll be shopping on Black Friday with my oldest, a tradition that we have been doing together for decades. I'm doing my part to help the economy! LOL My other daughter somehow missed the shopping gene.

Happy Thanksgiving ~ Lee

Sunday, November 22, 2009

Way To Go Teen Card

I've been lax on doing cards for the grandkids when they hit milestones in their studies. When I saw a challenge called "Teen Terror" I knew exactly what type of card I needed for my granddaughter.

This is my first try at digi images, but I been wanting to use this "Back-to-School Teen" from Carolyn Bounds at Busy Beauties Boutique (http://www.shophandmade.com/Store/Busybeauties) ever since I won it on the Operation Write Home Blog Hop. My granddaughter raised her grades on her report card, so I thought she deserved a card for encouragement.

All of the design paper is from a Scenic Route Halloween scrapbooking kit. They are just too cute to put away until next Halloween. I got them for a song at Tuesday Mornings, so I didn't feel bad using them for other purposes.

All of the edges of the paper were inked with Tim Holtz' Peeled Paint Distress Ink. The ribbon is American Crafts that is topped with Fiskars Zingz. The digi was colored with colored pencils & blended with a blender pen. The sparkle & glitter part of it is the Magic Scraps glitter I added to the headband, pencil top, shoes & center of the flower. The Way To Go image by Hero Arts was stamped with Top Boss ink & embossed with Embossing Arts glittery bronze EP. I drew the images on the skirt & also on the notebook & added glitter to the stars on the skirt.

I was able to make this card fit numerous challenges. The first is from http://cupcakecraftchallenges.blogspot.com which was to use a digital image (I forgot to post it on time). I used the http://stampinfortheweekend.blogspot.com sketch for this card. The next is the http://dareu2digistamp.blogspot.com which wants you to use glitter. Next was my original reason to make the card at: http://cutecardthursday.blogspot.com which is called, "Teen Terror." Last but not least is the http://cinspirations.blogspot.com which wants "sparkle." One of these days I learn how to write click here & you'll be able to go to their website, but I'm still too new to blogging to know how to do that yet.

As you can see, it was harder to cut out all of the papers than it was to use a digi image. I just used my regular HP printer with white cardstock to print, no special inks. I still haven't worked on resizing them much yet, so I'll let you know if I feel the same way about them after I work with them more!
Lee

Hidden Turkey Card


Since Thanksgiving is approaching so soon, I thought I'd better get some of my Thanksgiving cards posted before it's over.

This card covers a few challenges. The first is the Stamptacular Sunday Challenge: "Turkey Time." Go here to check it out: http://stamptacularsundaychallenge.blogspot.com/ The next is the ABC-Challenge called "H is for hidden" at http://abc-challenge.blogspot.com.

I stamped the images with Black Versafine ink on white cardstock & embossed them with Black Ranger Ultrafine EP. They were colored with colored pencils & blended with a blender stub & Goo Gone. The sentiment was stamped & embossed with Stampendous Carnelian EP. All of the DP is by the Paper Studio & the cardstock pieces are scraps from my stash (yeah! Another card made that helped to get rid some more of that BIG scrap pile!).

The hidden part of the card is the turkey part. He's hidden under the Pilgrims. I just put a Target $1 Shop brad in the top of the center section so you can swing it around to view the turkey. The sentiment, "Do You Know Where Your Turkey Is?" & the turkey Pilgrims are by Westwater Ent. The turkey that's under the Pilgrims is made by DJ Inkers. The ribbon is more from my stash & the brad is from the Target $1 Shop.
Lee

Thursday, November 19, 2009

Monday Lunchtime Challenge Sketch 96

It's medallion time again! I admit it, I'm addicted! There's something about stamping multiple images, cutting them out, painting or glittering them and then putting them all together with foam adhesives to make them pop that is so gratifying to me. You can truly say that no two images are the same no matter if you use the same colors or not.
The first card uses the sketch for the Monday Lunchtime Sketch Challenge at: http://technostamper.blogspot.com/2009/11/monday-lunchtime-sketch-challenge-96.html and fits the Creative Card Crew Challenge #37 which is called "Strings Attached." This challenge is to make a card with some type of string attached & is located at: http://creativecardcrew.blogspot.com/

This beautiful image is the Fall Leaf medallion from Holly Berry House Originals. I just love, love, love these images & could work with them all day! The image was stamped five times on contrasting colors of cardstock with Top Boss Embossing Ink & orange Creative Zoo EP. The bottom image was cut out about an 1/8" outside of the embossed image & the rest were cut as close as possible to the embossed lines.
One nice thing about medallions is that you don't always have to layer them perfectly on top of each others if you don't want to. You can cut out several of the same image part but lay them on top of the previous image slightly askew. This way you can add more colors or more layers.
Back to the card. I was able to add to my collection of Twinkling H20s at the Rubber Stamp Chat's Virtual Convention last month, so I was itching to use them. I painted each layer a different color, and then I added a contrasting highlight color to each layer. After they dried (very quickly), I then layered them on top of each others with foam adhesives. This beautiful DP from The Paper Parachute was what inspired my colors, but I wanted some more bling, so I matted it with this textured metallic cardstock by DCWV. To get some more of the deeper purple into the card, I matted this layer on some unknown textured purple cardstock. I went looking in my stashes to find some ribbon & came across this textured thread, so I glued it onto the edges of the matting to add even more dimension. The CoMotion Happy Thanksgiving sentiment was stamped with Top Boss ink & embossed with Stampendous Pearlized Carnelian EP (my favorite EP color!). All of the edges were inked with Memories Violet ink.
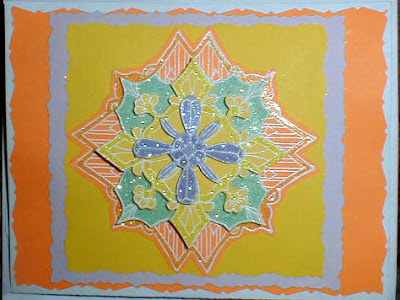
The card still needed something else, so I embossed three brads with EP & put them in the corners. Now, I was finally happy with the card & I hope you are too!
My next card is for the Stamp Something Challenge Blog at: http://stampchallenges.blogspot.com/2009/11/sketch-something-challenge.html
This is another medallion type stamp from Outlines Stamp Co. I just recently found this company, and you can already tell that they are quickly becoming another favorite.

This image was stamped & embossed with JoAnn's Ink Essentials Gold EP on some DP from my stash instead of my usual cardstock. The two other layers were stamped on some unknown stash cardstock. Since this image has so much detail, I didn't want to paint or glitter them. These layers were cut out close to the image & layered on the image with foam adhesive. I found some gold braid in my sewing stash that I glued on the image with Aleene's Tacky Glue. The red rhinestones were glued to the centers to resemble tree lights. I have some gorgeous poinsettia lights that I hang at Christmas that reminded me of these stars.
The DP in the background are all from the Paper Studio. These were inked at the edges with cranberry Memories ink. Since I was in my sewing stash, I also found these rickrack trims to accent the mattings. The tree was matted on a gold DCWV textured matstack & the trims were glued on with the Tacky Glue. To add some more eye candy, I added a few extra stars with rhinestones to accent the corners.
This card may look difficult, but it was really easy to cut since most of the edges are straight cuts. Instead of cutting each star out individually, I cut the bottom layers of stars out in a row. This also made the placement much easier. Don't let the look of medallions make you shy away from them. You would be amazed at how quickly you can put them together. ~ Lee

Sunday, November 15, 2009

Operation SUCCESS!!!!

WOW! What a day we had yesterday on the Operation Write Home Veteran's Day Blog Hop! I can't believe the number of people that viewed the hop & that left such gracious comments. I especially want to thank all of my fellow bloggers for their awesome designs AND the cards for our heroes!!!!! If everyone that followed the hop sent in just 25 cards to Operation Write Home, can you imagine all of the soldiers that we would be able to serve???? I know from my daughter how much these cards mean to our soldiers. They also can't believe how much total strangers are doing for them even though they don't consider that risking their lifes for us to be that big of a deal.


Well, now for the WINNER of my blog candy!!!!!!!!!!!!!!!!

Congratulations go to MARY of my scrap happy life!

Please contact me as soon as possible with your address, so I can get the goodies out to you.

Thanks again to everyone that was involved in this hop from the awesome people over at Operation Write Home, the bloggers, the hoppers & most of all; ANYONE that does anything to help a soldier! Also, if you have a family member who is involved with the military in anyway, I also want to thank you!

Saturday, November 14, 2009

Operation Write Home Veteran's Day Blog Hop & Blog Candy

Welcome to the Operation Write Home Veteran's Day Blog Hop! This wonderful organization is made up of tons of people that make cards for our soldiers that are serving overseas. My daughter was one of these brave soldiers that was a recipient of the cards that this organization sent for the soldiers to send home for their families. It's not like they could run to a PX & pick up a Christmas or Valentines Day card in the middle of the desert! If you want to know more about this awesome organization, please click on the Operation Write Home logo on my sidebar.

Now for the hop! If you came here from Barbara's blog http://barbarade.blogspot.com/2009/11/operation-write-home.html , then you're at the right spot. If not, go back to the beginning at: http://www.owhhomefrontblog.org/2009/11/owh-veterans-day-bloghop.html I usually try to make several love cards to send in with any cards I send. We always highlight the different holidays, but they need love, birthday, anniversary and other such cards all of the time.

My first card is made with a PSX wolf stamped on white cardstock with Artprint Brown Memories ink. It was the colored with a watered down wash of H20s & highlighted with a white gel pen. The circle frame from Inkadinkado was stamped on cardstock with Top Boss embossing ink & embossed with Detail White EP from Stamp 'n Stuff. These were then placed on top of this Around the Block two-sided card stock following a challenge sketch from Mojo Monday week 112. All of the edges were inked with Sea Brights Pool ink & then I added some flourishes from Autumn Leaves. The sentiment is an oldie but goodie from JRL designs. I topped it with a ribbon & used a white gel pen for some doodles around the edges.

Next is a card made with an awesome stamp from Outlines rubber stamps. I just found out about this company lately, so I'm having a blast with their designs. This image was stamped on card stock with Top Boss embossing ink & embossed with Detail White EP. I stamped the image numerous times so I could layer it to add some dimension. That's a great thing about the OWH cards. You can add all sorts of embellishments (except glitter for safety reasons!) since the soldiers can send their mail home for free. Back to the card. This particular image has five cutout layers, but you could add or subtract to your liking. I just glued them on top of each other after I cut them out instead of using foam adhesives like I usually do. I got out the H20s again to add some more color & then I matted it on some more card stock. This layout was a challenge from Stamping 411 although I didn't use Stampin' Up! products. I put all of it on top of some Paper Studio design paper, added a Martha Stewart ribbon bow, highlighted it with a white gel pen & it's ready to go (after I stamped the inside sentiments which I always do for these cards).

This is really turning into a long post, so lets get to the BLOG CANDY!!!! If you are a follower that leaves a comment on my post, you will be entered to win this fun package of stamping goodies pictured below to help you get jump started on your OWH cards! You'll even get an Operation Write Home custom stamp for the back of your OWH cards along with a CC rubber heart wreath & a Judith rubber stamp. I'm sure I'll find more stuff to add to this loot! Sorry about the picture quality today. It's really overcast outside, so the flash messed with the colors.

Your next stop on this hop is to Lori's blog, http://lorikins.blogspot.com/2009/11/operation-write-home-blog-hop.html Lori is an awesome lady that usually scrapbooks, but has joined us in making cards to help out the troops. Her mom has just finished her chemotherapy treatments for cancer & is still going strong, God bless her! These awesome ladies recently went to a Rick Springfield concert & had front row seats & backstage passes thanks to her mom's BFF. What an awesome gift! ~ Lee

Thursday, November 12, 2009

WOW! Two Cards in One Day!

Gad zeeks! I'm actually listing 2 cards in one day!

The first card uses one of my favorite angel images, at least for now anyway! LOL This Hampton Arts music angel image from 1997 was stamped on white cardstock with TopBoss embossing ink & embossed with an unknown fine silver EP. I colored it with Zig markers & blended it with a Zig blender pen. Since I only had 2 blue markers that matched the DP, I pulled the blues from the darker areas to make the lighter colors. Then came the trusty ol' white gel pen for some highlights. The edges were then inked with Sea Brights Pool ink. After double matting the image, I glued it on top of the DP with an Ad Tech glue runner. I'm really trying hard to use up as many scraps as possible, so I'm unsure of who makes the design papers, but I would guess they may be from the Paper Studio. The stars were also a part of my stash, as well as the silver corner embellishments.

The next card was made for the Mojo Monday challenge #111, but I didn't get it posted in time. This snowman image by Stampendous is called Snow Lights. It is inked with black Versafine ink and embossed with black Ranger Ultra fine EP. The image was colored with Kaisercolor chalks & highlighted with a white gel pen. The lights were coated with Diamond Glaze and left overnight to dry. The next morning, I glued on white Fun Flock to the hat and a mixture of glitters on the snowman. After they dried, I inked the edges with Sea Brights Pool ink, matted the image & glued it on top of Momento Christmas Party DP with an Ad Tech glue runner. All of the bling & ribbons were also from my stash except for the snowflake which is a Target package topper.
Don't forget to stop back here Saturday the 14th for the Operation Write Home Veteran's Day Blog Hop. I will be offering Blog Candy to a follower that comments on my post on Saturday. In addition, there are over 75 blogs involved in the hop, so you may even get lucky on some of the other blogs, too! I already consider myself lucky to be involved with this awesome organization, so click on the Operation Write Home logo on my sidebar if you would like some more information about them, or if you would like to make cards for our heroes overseas. I can speak from experience that the soldiers are very appreciative of these cards. My daughter was one of them! ~ Lee

My Hero!

I wasn't able to post yesterday, but wanted to make sure I saluted all of the veteran's. Since we live so close to numerous military facilities, every day is like Veteran's Day for us. You can't help but say thanks to a complete stranger in uniform when you see them in line at a grocery store or gas station.

If you don't already know, my daughter is a Sgt. in the Colorado Army National Guard 220th MP unit. She reenlisted in 2008 at the largest overseas reenlistment ceremony while she was in Iraq. This is a picture of her at one of Saddam's former palaces where the ceremony was held. I can't help but be VERY proud of her!
I went through a very tramatic divorce in 2001 along with becoming totally disabled. Chelsey was just starting her junior year in high school, & I had her staying with friends because of my circumstances. She had completed two years of JROTC classes at her school, and she decided to continue with this program for another two years. Thanks to her teacher, Sgt. Frank Liesten, she not only decided to enlist, but she attended basic training in the summer between her junior & senior years in high school. She graduated from high school and finished her military training, is an Animal Welfare Officer, owns her own dog training business and has a college degree in criminal justice. She could have taken a very different path, but I couldn't be prouder of the direction she took. She'll always be my hero!

Don't forget to stop back on Saturday, the 14th, for my post on the Operation Write Home Veteran's Day Blog Hop. You can click on their link on my sidebar for more information about this wonderful organization. I'll be offering some awesome blog candy to one of my followers that leaves a comment that day, so make sure you don't forget to stop back! There's over 75 blogs involved in the hop, so you won't be disappointed. ~ Lee

Monday, November 9, 2009

Creative Cuts & More Our Favorite Recipes Blog Hop

Over at Diecut Diva's blog, they're having a recipe blog hop. If you want to win a Creative Cuts & More 8 x 8 Treasured Families Recipe Kit, you have to play. Just go on over to: http://www.diecutdiva.com/ to see how to play!
Here's the recipes for some tasty appetizers that I take to potlucks or parties:

**********************************************************
Sweet & Sour Little Smokies

Package of Little Smokies (or hotdogs cut into chunks)
Jar of Chili Sauce (I use Heinz) Small Jar of Grape Jelly

Put the chili sauce and grape jelly into a saucepan and stir often.
Heat until warm. Add smokies or hotdogs.
Serve hot or place all ingredients in a crockpot.
I place toothpicks beside the crockpot on a buffet line.
***********************************************************

Kerry's Beau Monde Dip

1 Cup Sour Cream
1 Cup Mayonaise (Hellman's or Best Foods work best)
1 Tablespoon Beau Monde (I use Spice Island)
1 Tablespoon Dill Weed

Mix all ingredients together.
Cover and let sit in the refrigerator for at least an hour
before serving to blend flavors together.
Serve with raw vegetables.
***********************************************************
Enjoy! ~ Lee

Tuesday, November 3, 2009

My First Outlines Ornament!

Welcome everyone! I decided it was time to get started on my personal Christmas cards, since I've been working to get Christmas, love, thinking of you & more cards ready to ship out to Operation Write Home. As you should know by now, I love medallions & Christmas is such a great time for them.

I mainly use Holly Berry House medallion stamps, but recently a friend in one of my groups introduced me to Outlines stamp company. Rut roh!!! They have some absolutely gorgeous medallions along with some other really awesome mandalas, Christmas trees & ornaments & tons of other stamps that you can go nuts with the bling! These stamps have made me really think outside of the box on my medallion creations. I usually just pop up layers, but I decided to do something a bit different this time.

The design was stamped & embossed on six different coordinating colors of cardstock that matched this gorgeous design paper from the Paper Studio. Here we go with some more non-traditional Christmas colors again! I like to use the lighter colored embossing powders (or metallics) on my medallions to give them more of a pop. Next, the layers were cut out with very sharp detail scissors & a craft knife. When I was playing with the layers, I decided to cut out the inside of one of the layers & go from there to make it less bulky. I really liked the effect it gives. After deciding on the placement of the layers, I used my glue pen to put glitter on some highlighted spots on the designs. I was going to add rhinestones, but decided to just use glitter on this as you can see in the photo. To finish off the design, I put foam adhesives between the layers to give it dimension. This was matted on an oval of dimesional cardstock, and then I added some little snowflakes to give it even more of a Christmas feel. I tied on a ribbon and here's the result! No challenge today, but it was still fun to do.

Lee

Card Recipe:
Rubber - Outlines Ornament I159
White Pigment Ink - Tsukineko
White Ultrafine Embossing Powder - Copper Kate
Glitter - Magic Scraps
Cardstock - Paperbilities
Design Paper - The Paper Studio
Ribbon - Hobby Lobby
Snowflakes - Hobby Lobby

Monday, November 2, 2009

Grandkids Halloween 2009

Well, here they are...my youngest grandkids in their Halloween costumes! Can you tell that my Sully (aka Durricula as he says) is a bit dramatic! And poor Pooh Bear Bradley couldn't find his honey pot, so he had to settle for a bottle of milk! Bailey was with his dad this year & Chloe's had to go to New Mexico for a funeral, so we just had these two. I think they're adorable!


Lee


Saturday, October 31, 2009

Dancing out the Halloween season

Woohoo! I was finally able to get some stamping done today. I needed one more Halloween card, so I thought I'd kill two birds with one stone & make it fit the Saturday Night Spotlight challenge SSHPO5, In So Many Words. Although I didn't stamp the words to highlight the card, I chose a paper by Cloud9Design that has almost all of the words that relate to Halloween. Don't you just love the dancing skeleton? He's definately one of my favorite Halloween images.

This card was easy peasy to make. I stamped the skeleton on the alternate side of this design paper with dye ink. The orange paper was another contrasting piece that I had that just happened to match up with some American Crafts Elements ribbon that I got for a song at Big Lots a couple weeks ago. The card was too plain with just the ribbon & matted skeleton, so I matted a couple images from Holly Berry House stamps to complete the scene. As you should know by now, I had to add some bling, so I grabbed a couple square jewels from my stash & turned them to match the Holly Berry House images.

I never leave the inside bare, so I stamped another Inkadinkado image that I got at Tuesday Mornings yesterday for only 99 CENTS! I wish I had embossed it, but it shows up much better in real life. I have an old foam stamp set that had the Happy Halloween image in it that fit just right, so I stamped it inside the other image with dye ink. Next I cut out the image & matted it on some of my purple cardstock stash after I inked all of the edges. To finish it off, I glued it all onto another piece of the Cloud9Design paper & it was done. I wish they all went together so easily!
It's a good thing this was so easy because I have plenty of stuff I want to buy from the vendors that are involved with the Fall Virtual Convention over at Rubber Stamp Chat. If you're like me & can't get to the real stamp conventions, this is the next best thing! Lots of vendors have tons of stuff marked down for this sale. There's even games to play for some really cool prizes. If you've been planning (or not) on buying anything stamp related & then some, you better click on the Rubber Stamp Chat logo on my sidebar & see all of the companies that are involved in this awesome convention. There's no better way to shop then sitting at your computer in your jammies while you're sipping on some coffee & choose what you want to buy at your leisure! It will be over on Monday, so you better get over there quick!

Lee

Card Recipe:
Skeleton image by Inkadinkado
Bat & Flying Witch images by Holly Berry House
Spider Web frame image by Inkadinkado
Happy Halloween images by unknown
Black Dye Ink by Memories
Colored Dye Ink by Ranger Sea Brights
Ribbon by American Crafts Elements
Bling by unknown
Adhesive by AdTech & Aleene's Tacky Glue Pen

Check out Holley's Blog Candy

Do you like blog candy like I do? I don't even have to wait for an answer! One of my friends from a Yahoo group I belong to is offering some really great blog candy. If you have a Cricut, you won't want to miss it because it's a Cricut Joys of the Season cartridge. So, you're like me & don't have a Cricut. No problem! She's offering 25 assorted rubber stamps to the winner if you let her know that's what you want instead. SWEET! She's even got a bonus prize, but you have to check that out yourself at: http://holleybarnhartsblog.blogspot.com/2009/10/its-blog-candy-time.html?showComment=1256998797886#c6420882983327654008

Lee

Friday, October 30, 2009

Santa Claus is here already

I made this card for the monthly sketch challenge over at Rubber Stamp Chat that is sponsored by Bombshell Rubber Stamps. Although I have made many cards with this sketch since it's so easy to work with, this was the only one that I took a picture of to show you.

The card is 5" x 7" which is bigger than my usual cards, but it worked better with the image & the sketch. The Santa image was stamped & embossed on a piece of white cardstock. I choose to emboss it with purple to match the papers better. I then colored the image with chalk & then put Crystal Glaze in the inside of the wire frame to look more realistic.

After I inked all of the edges of the card & papers with dye ink, I matted the image on a circle mat. Next I glued it on top of the two pieces of design paper that was cut about 1/8" shorter than the card. To make sure the ribbon stays on better, I cut a slit on the inside edge & ran the ribbon through the slit & glued it on the outside & inside of the card. I added some sparkle with the glistening yarn & glued the snowflakes on top of the ribbon. The inside was then stamped & embossed & the Operation Write Home image was stamped on the back of the card. One thing I did add after I took the picture was a little white dot with a gel pen on each of Santa's eyes. If you don't have a white gel pen to do this, you can always dip a toothpick or end of a paintbrush in white paint & just barely touch in the eye as a highlight.

Since this card will be going with the tons of other cards that I'm sending to Operation Write Home to be sent to our soldiers overseas, I wanted to make sure that I didn't add glitter, but Santa does deserve a little sparkle! I love to use non-traditional colors for my holiday cards as much as possible, so I can use more of my everyday papers. Don't forget to come back on November 14th to my blog & all of the other participants for the Operation Write Home Blog Hop. Don't forget to sign up as a follower on my blog for your chance to win some awesome blog candy after this blog hop. You won't be disappointed!

Lee

Card Recipe:
Image by Victorine Originals
Candy Violet EP by Joann's Craft Essentials
Embossing ink by Top Boss
Purple ink by Memories
CS & DP by Hobby Lobby
Chalk by Kaisercolour
Crystal Glaze on eyeglasses
Ribbon by unknown
Snowflakes by Craft Essentials

Saturday, October 24, 2009

Black, White & a Pop of Color challenge card

I was blog hopping last night & came across a challenge from Paper Maniacs at http://papermaniacblog.blogspot.com/2009/10/paper-maniac-inspirations-challenge.html They wanted cards made with black, white & a pop of color. Can you believe that I had just finished making one that fit the challenge? Usually I see the challenges & can't find them again. Well, this time I actually wrote it down so I didn't forget to enter! They will have a new challenge on Sunday, so you better be quick if you want to enter

I really love this image from Impression Obsession, but I couldn't decide what to do with it. I remembered that I had bought a ton of these foil squares at a garage sale, so I decided to give them a try. Boy, I'm glad I did! I love how it really sets this scene off!

First I stamped & embossed (yes, embossed, even w/the fine details!) the image on white cardstock. Then I stamped & embossed it again on the foil & cut out just the sky area. I then glued this section carefully on top of the main image. Finally, I stamped & embossed the image again on some more white cardstock & cut out just the sled. For the final touch, I glued the embossed sled image on top of the foil image of the sled. It really popped, but the wreath on the door needed something. I decided to get out some 1/4" red ribbon & made a bow to balance the color. I thought I was done, but now that I look at the picture, I think I may add some snow to the rooftop, or not!
Lee

Card Recipe:

Image: Impression Obsession K1026 'Twas the Night

Cardstock: The Paper Studio

Ink: Black Versafine

EP: Ranger Black Superfine

Foil: unknown

Ribbon: 1/4" red Hobby Lobby

Adhesive: Ad Tech Glue Runner & Tacky Glue

Friday, October 23, 2009

Veteran's Day Operation Write Home Blog Hop

I got my confirmation yesterday that I will be one of the stops on Operation Write Home's Blog Hop on the Saturday after Veteran's Day, November 14th. You won't be disappointed! This organization accepts handmade cards from all over to send to our troops overseas. OWH ships the cards to them so they can have something nice to send home to their families. With all the stores in the US that we have all over the place, it's hard to imagine that our heroes can't go out & buy a card for their loved ones in stores in places like Afghanistan or Iraq. They're lucky if they get a regular shower!

As soon as I heard about the blog hop, I knew I wanted to join in. If you don't already know, my daughter is a Sgt. in the Colorado Army National Guard 220th MP Unit. She did a tour in Baghdad, & she will probably have to go to Afghanistan since she reinlisted for 3 more years last year while she was in Baghdad. Making cards is one of the few activities that I'm still involved with due to my disabilities.

I will be offering BLOG CANDY to one of my followers that comments on my blog on November 14th. Some of the items I will be offering include a custom stamp with the Operation Write Home logo for the backs of your cards (not required, but it helps them out in the mailroom!), rubber stamps by Judith & CC Rubber Stamps, The Paper Cut White Luster Twist Cards, Martha Stewart Crafts ribbon, K&Company adhesive gems, tons of design paper & LOTS more! I'll try to get the picture up later today.

If you want to be involved in this Blog Hop for our Heroes, click on the Operation Write Home logo on my sidebar for more information. The last Blog Hop they had on Memorial Day had over 150 blogs involved, so you won't want to miss this one!

Lee

Friday, October 9, 2009

Stamp Something Brown Challenge

On the Stamp Something Challenge Blog, they have a challenge asking you to use the color brown on your card. The sponsor of this challenge is iCopic, & they're offering a set of 12 soft pastel Copic Ciaos. You can bet your bootie that I want to enter this challenge! I've heard so much good about Copics, & I would love to win this set to give them a try before I buy! I just LOVE the color brown on almost anything, so I didn't have far to go to find this card.

You can get to this challenge site by following this link: http://stampchallenges.blogspot.com/2009/10/brown-plus-something-challenge.html

I stamped this card a while back with this beautiful Holly Berry House Butterfly medallion stamp. I stamped the image 3 times, embossed each layer with bronze embossing powder, added Magic Scraps glitter, layered the butterfly image with Pop Dots & then placed it on a layered background that uses LOTS of browns! I've been on another medallion stamping spree lately, so whatever doesn't go to the nursing home will probably end up on my blog soon.

Card Recipe:
Rubber - Holly Berry House Butterfly medallion
Ink - Versamark
EP - Ranger Bronze
Glitter - Magic Scraps & Art Glitter,
Cardstock - Paperabilities, Bazzil textured, DCWV the Metallic Stack,
DP - DCWV Once Upon a Time Matstack, Colorbok Carnival Pack
Adhesive- Pop Dots, Scotch taperunner & Zig 2 way glue pen
Decorative Scissors - Fiskars

Happy "Brown" Stamping!
Lee

Sunday, October 4, 2009

More Stoney pics


My service dog, Stoney, became a member of the family very quickly. Her real personality took a little longer to show up. She's almost as big of a ham for the camera as my grandkids. Scratching her back on the grass rates right up there with playing with her tennis balls or Nylabones. Do you think the back scratching has anything to do with the harness she usually wears??? ~ Lee

Stampscapes tag swap

I know I have been MIA lately, but family does come first! Hopefully, things will be back to abnormal soon, so keep checking back for more!

I was in a tag swap in my Yahoo Stampscapes group, so I thought I would share with you some of my creations. My swap partner is Darsie Bruno who is a truly gifted artist, so I hope she won't mind this newbies tags! This is the first time I've used glossy papers with my Stampscapes images. I truly have so much to learn, but I really love the ease of using makeup sponges as brushes with my stamp pads.

The tags may look hard to do, but they really come together quickly! Kevin has done such an excellent job of designing his Stampscapes line. They really blend together well & are very forgiving (good thing for me!). If you make a "mistake," you can usually cover it with another stamp. You can really add dimesion to the scenes by adding more images at the front of the scenes like the tree branches I used.

The images are stamped on glossy card stock. For this swap, I cut out 4 pieces of one sheet of 8 1/2" x 11" Kromekote glossy paper that I got this paper from a local copy shop, after coming up empty at all of the big name office supply stores.

On the first tag, the main image is stamped 2 times. I used the right side of the stamp on the left side of the paper & then the left side of the stamp on the right side of the paper. You can just put some torn paper towels over the image that was already stamped, so you don't end up with a lot of overlapping. Next, I stamped the cumulous clouds several times in the sky. The fun part was the coloring. Start w/the lighter colors & work up to the darker ones. There isn't a main light source on this tag, so the shading & highlights weren't as pronounced. I wish I had left more white spaces on all of the tags, but I guess you have to start somewhere! After I was done coloring, I added the bass, bird & branch images to the scene. There is some color on the bass, but the other images were left as is. Always spray these pieces with some sealer when you are done. It was finished off with a sticker sentiment & layered over the DP & card stock.

The next tag was stamped with portions of the stamps again. First, the cabin image was stamped. After covering w/torn sheets of paper towels, I stamped the right side of the cove image to the left of the cabin. While the cabin was still covered, the left side of the cove image was stamped in the forefront of the right side. I messed up on this image some, so I covered it up w/aome extra tree images. The clouds were added & colored like the rest of the images & then the branch, fisherman & duck were stamped last. It was finished off w/glossy sealer & matted & a ribbon was added to the top. I found another sentiment sticker to add that seemed to fit this image perfectly, but Kevin at Stampscapes has some great sentiment stamps that he just added to his line of stamps recently that would work just as well.

The third tag followed the same process as the others. The right side of the cove & the left side of the boulders & trees were stamped first. The clouds were added & everything was colored. The branch & the pine trees were added to the scene for dimension, & I blotted black ink around the edges. After spraying w/sealer, a sticker sentiment was added. Some more matting & a Kimberly Poloson rub-on was added at the top.

The last image would have to be one of my favorites especially since it uses one of my numerous covered bridge stamps! This image is by Wildlife Enterprises. I started w/the covered bridge image, & then added some rocks by Art Impressions to the right of the bridge. I covered the bridge & added the mountains. I stamped the main mountains about 3/4 of the way from the left edge, & then I masked this image & stamped the mountains again to the right side. I think I had to stamp a bit more of the mountains to the right of the bridge to fill-in the scene better. The clouds were added & everything was colored. The branch was added to the right side, & an unknown maker bare tree was added to the bottom along with the tops of the pine trees. This scene was triple matted & another rub-on was added to the top along with a stray silk leaf.
Ta-Dah! This was the last tag in my first Stampscapes group swap. I hope I will be involved in many more if the group allows. I just love seeing all of the great images that have already been added to our photo album over at the Yahoo group Stampscapes II. I have to add one more image of a card I made to thank Darsie for being my swap partner, & it was also her birthday last week. This card used one of Kevin's earlier images that he created when he worked for A Stamp in the Hand. I decided to try my hand at highlighting with a white gel pen. Kevin using this technique all of the time, & it just adds so much more to the scene. I have a way to go before I master this technique, but I really love what it does to the scene. I added a Coloroasis sticker to the card, & a ribbon from Hobby Lobby.
Happy Stamping!
Lee

Recipes:
All images by Stampscapes rubber stamps unless listed
Ink: Main images - Black Memories dye ink
Adirondack, Seashells, Sea Brights, Stamp it & Memories dye ink
DP: 1st tag - Frances Meyer Blue School Skirt
2nd tag - Karen Foster Design Natural Burlap
3rd tag - the Paper Studio Green Country Cackle
Cardstock: Paperabilities
Ribbon: Unknown except as listed
Embellishments: Unknown except as listed

Sunday, September 13, 2009

Cards for Heroes Name Change

One of the groups I'm involved with has just changed their name from Cards For Heroes to Operation Write Home. It seems that one problem with the old name was that many people couldn't find them due to a common misspelling of the word heroes. After some research & changing the required documentation issues, they announced their name change a couple days ago.

If you have one of their old stamps, you can continue to use it until you get a new one. They are also able to have visitors to the old site forwarded to the new one. There may be a few kinks along the way, but I'm sure that it will be for the better. I know I have to explain what the group does to many people, so I believe that the name change will help others realize that we make cards for the soldiers to send home to their families.

When my daughter was serving in Iraq, I realized the problems that the soldiers had finding cards to send home. The soldiers receive free postage when they're overseas, but they usually can only get writing paper to send home. When they receive these cards, not only does it boost their morale, but it also helps them realize that we are willing to help both the soldiers & their families that are also enduring hardships. My daughter would always give her soldiers 1st choice on the cards that I sent. This made me realize how important these cards were to the unit.

If you haven't checked out this organization before, check them out at: http://www.operationwritehome.org/ This page gives you the list of dos & don't to send & other pertinent information. I'm offering blog candy that's listed below to my followers who join with me in sending tons of cards to this organization to be sent to our soldiers serving overseas. I'll be posting the pics soon on what I'm offering, so now's the time to start stamping in support of these gracious heroes.

Thanks in advance for helping these heroes!
Lee

Tuesday, September 8, 2009

Meet Miss Stoney

I've been so excited about getting my new service dog that I forgot to post more about her. She got to come over the other day & check out my place, so you get a peek at her!


Her name is Stoney & she's a rescue. The original owners had her & 2 min pins. They brought her to my trainer (who also happens to be my daughter Chelsey) for boarding & they never came back for them. This economy really makes people do desperate things. Chelsey found a home for the min pins, but it didn't take long for her to realize that Stoney would make a great service dog. Stoney is a big ball of fur that just wants to be loved. She has done an excellent job in her training, so she will be a godsend to me.


Notice her harness. This is a sign that a dog is a service dog. You will also see them with different colored capes that may or may not say service dog. If you see a dog with these things, make sure you ask before you pet them. The dogs are very protective of their owners & can sense all kinds of things. The harness is used for lots of things, but the main thing is for bracing when I need to get up. You can't expect a 20 pound dog to help with that!


It will really be a blessing to having her around. I have trouble picking stuff up when I drop it, so she is trained to pick up small stuff. Have you ever seen a dog pick up a coin off the floor? Stoney can! Now if I drop something when I'm making my cards, I can have her pick it up & finish the card instead of having to do something else because I'm too sore to bend. If I get on the floor to do my yoga, she will brace me so I can get up which will help with my dexterity. With the help of Stoney, hopefully I will be able to build up some endurance. I will be walking more when I take her out, even though it will just be for short walks in the beginning.
The biggest thing I learned from having animals is that they sense when you're hurting. They just nuzzle up to you so you can stroke them & take your mind off your pain. That's why you see so many dogs in nursing homes. I've really missed having my dogs, so now Stoney will serve two purposes. She will be my buddy & guardian angel all in one!
Lee

Monday, September 7, 2009

Doodlefactory blog candy

Sorry I've been MIA lately, a family emergency came up. Between the hospital & watching my 2 energetic grandnieces or my 4 equally challenging grandkids, I'm ready for a loooong nap!

I've been trying to catch up on my reading & found some great blog candy I just had to post. This one is sponsored by Starving ArtiStamps home of the DoodleFactory. You can win one of the new release stamp sets if you win. My personal favorite is the DoodleFactory Costume Party. They are just too cute & I'm not even a big fan of cute! They are also sponsoring this month's sketch challenge over at Rubber Stamp Chat. You can try your hand at the sketch on the left & you may even come out with some more stamps from there, too! All you have to do is hop on over & become a follower & post the link & you could be the lucky winner...that is if you don't forget & I'm the big winner! teeheehee!

Haven't been able to stamp lately with all that's been going on, but I will catch up soon.

Lee

Tuesday, September 1, 2009

Tis the Hero Card Challenge

It's that time of year again. CHRISTMAS CARDS!!

If you want to help our veterans serving overseas, now is a great time to start! I challenge each & every one of you to make one or one hundred cards to send to our veterans overseas this holiday season. My daughter was in Iraq last year during the holiday season, so I really appreciate what others did for her. Now it's time to pay it forward by doing the same for others that are giving some much for us here at home.

One of the best ways to help is to join this great organization. It's FREE! Next, you make a ton of Christmas cards & a couple extra birthday or thinking of you cards for the vets to send home to their families. Then you can either mail them to me & I will send them on, or you can follow the link at the top of my blog to send to a Cards For Heroes coordinator closest to you. This challenge runs from September 1st to October 15th. The usual dealine for the holiday cards is November 1st, but the challenge is available only until Ocotber 15th so there's not such a rush at the last minute.

I will be in touch with the coordinators to see who has donated cards from my blog, but I want to offer some blog candy to a lucky random winner, who is also a follower of my blog. What will you win? I just found out about the challenge, so I don't have the candy figured out yet, but I will let you know real soon! I LOVE shopping for others, so you won't be disappointed! Sign up now, so you don't forget and start those cards TODAY!!!
Thanks for thinking about our Vets!
Lee

Monday, August 31, 2009

Covered Bridge in Red, White and Black

It's time to introduce you to some of my covered bridge stamps. Why covered bridges? I'm from Ohio, & I just love to go back east & check out some of the bridges I remember & even more that I don't. My favorite memories of covered bridges are all in the fall. The fall trees back east have so many beautiful colors. We do have the beautiful golden colors of the aspens here when they turn in the fall, but nothing compares to that great spectrum of colors you see back in Ohio & other eastern states.

I saw a card challenge today that wanted you to only use the colors red, white & black. I immediately knew that I wanted to do a covered bridge scene (& a Christmas one that I just got from Impression Obsession - more on that later). I usually stamp the bridges with lots of fall colors, but I knew I could make one of these stamps seem a bit more formal with these colors. By the way, I can't remember where I saw the challenge, but I finished the card anyway.


I stamped several images before I decided on this one. I tried the white on black, but I couldn't make the red pop & then I tried red on white, but the black highlights were too much. I did stamp this combination first, but as usual, I just had to try a couple more options. I'm used to putting backgrounds & colors with the covered bridge scenes, so it was hard to stop when I did. It would've taken away from the image if I added anymore which is not something I usually do. It's really time to get a new camera so the detail shows up much better, but since I'll be getting my assistance dog on the 15th, I need to get some more items for her before I can spend money on a new camera.

Card Recipe:
Stamp: Stamp Cabana
Ink: Versafine Onyx Black
EP: Ranger Super Fine Detail Black
DP: The Paper Studio
Black Card Stock: Paperabilities
Polymer Image on Black Card Stock: ????
Black Paper EP: Detail Clear
Black Mulberry Paper
Red Paper: Echizen Embossed - Papers by Catherine (love the detail & shine!)
Ribbon: The Craft Studio (black & white dots) & Michael's (red sheer)
Rhinestones: Cell phone embellishment from Target

Coming next - the Impression Obsession image,
Lee

Wednesday, August 26, 2009

Tuesday, August 25, 2009

Playing w/Ranger Dimensional Pearls

I've been watching a lot of videos lately on YouTube since I don't have cable TV. I used to be able to get all three major networks, FOX & PBS, but now I only get ABC, NBC & three Spanish speaking channels aaarrgh! But I digress. I was watching some of the Three Peas in a Bucket videos at http://www.youtube.com/watch?v=5n9dzc_A82k These videos are a series that talk about the Ranger line of Distress Pearls, Stickles & Dimensional Pearls. I already love these products, but thanks to these how-tos, I now can add more uses to the list.
If you like bling & have Dimensional Pearls, just squeeze out various size dots on a piece of wax paper or other release medium & then tap them with your finger on the underside to smooth out the surface texture. Let them dry overnight & then you could use them w/your favorite glue to add bling to your cards or scrapbooks. You can also store them for later use.

I love the Twinkling H20s, but their prices were getting out of hand when everyone thought they were going to discontinue them. Well, you can make your own similar products by using your Dimensional Pearls with water. Just mix the two together & apply with an aqua pen or a watercolor brush & you will have gorgeous shine & vivid colors. I love being able to use my supplies for more than one use!
Since I've been talking about medallions, I thought I'd post another example of some more cards made w/Holly Berry House medallion stamps. Both of the following two examples are made with the same stamp, the Cautious Crocus medallion. Even though I used 4 layers on each medallion, I cut them out differently. The last two pieces are cut differently to alter the look. If you can't make as intricate as cuts, the first medallion would be easier to cut. You could even cut as many as seven or eight layers with this stamp. That's what I love so much about medallions. You can just do one layer or tons of layers, or even just change the colors & you look like you are using different stamps.
Lee

Monday, August 24, 2009

More medallions from Holly Berry House


These are two Holly Berry House medallion stamps that I used to make cards earlier this year to make cards for the nursing home. I was trying to make a few special stamps each month that I let the nurses choose who to give them to, but I decided it was time to put some more time into more of the cards. Since I love doing medallions, I thought they could use them as wall art like I do with mine.
I followed the same techniques as the butterfly medallion I made for the Rubber Stamp Chat August sketch challenge. Remeber that you need to use extra fine glitter on these medallions, or you won't get the same effects. Just think what you could do with different colors of cardstock or ink. I think I want to try some of the Fall Leaves with gold embossing & painting them with either Twinkling H20s or some Ranger Dimensional Pearls watered down & used as watercolors. I saw the last technique on YouTube & I can't wait to try it out.
First card recipe:
Stamp: Holly Berry House Apples & Oranges medallion
Ink: Top Boss Embossing ink Embossing powder: CopperKate White Ultrafine Glitter: Magic Scraps Ultrafine Cardstock: Paperabilities Layered w/Pop Dots
Second card recipe:
Stamp: Holly Berry House Fall Leaves medallion stamp
Ink: Top Boss Embossing ink
Embossing powder: CopperKate White Ultrafine
Glitter: Magic Scraps Ultrafine
Cardstock: Paperabilities
Layered w/Pop Dots
Lee

LinkWithin

Related Posts with Thumbnails